
Laundry is nicer when we have it on our own property. We all agree with that. Except maybe when something goes wrong.
The location of the laundry connections has no rules or guidelines. The connections can be at the old original laundry porch of a house. Often times when a house was built between the 1920’s and 1960’s, there may have been a laundry sink only and a clothes line outside. When remodeling comes into play, a modern washing machine may not fit where the old sink was located.
All appliances are designed to fit through an interior 30 inch wide door. With the parting sash (the little wood on the frame for the door to “stop” swinging when you close it) being 1/2 inch thick on both sides, that leaves an opening of only 29 inches. All manufacture’s know that. So almost every appliance has at least one dimension that will be 29 inches so you can move the appliance into the house and through the doorways. Often they will be between 27 and 29 inches in one dimension. What happens is the plan to put a washing machine in the old sink location is that the new appliance blocks part of a doorway. Remodeling is always an option but takes longer than one hour and costs more. As a rule, you look for 60 inches of side to side clearance to install a pair of full size washer and dryer appliances. There are smaller appliances made that will seem proportionally higher priced and that is only because of the laws of economics as few special size appliances are made.
Kitchen, porch or garage, accessible laundry is good. Many laundry connections are installed in a closet. Many of these installations can benefit from wall niche installations for the pipes and dryer vent. When a house is built, the water and gas lines and dryer vent are positioned and not always placed for “your” convenience but for the plumber’s quickest installation. When spaces are tight, setting the water pipes for supply and drain into the wall will free up 3 to 5 more inches. That can allow the door to swing open all the way and other benefits in tight spaces. The same goes for the dryer gas pipe or electric and the vent. Recessed into the wall helps provide a little more space and that could be exactly what you need.
EXHAUST FAN
You may wash with hot, steamy water and the dryer heats wet clothes up and creates more steam. Unless the connections are in the garage, the small closet, porch or separate room can become a mildew area. No matter where the laundry is located, think of the moisture issues that a laundry room creates. I like to recommend an exhaust fan in the laundry area. This area can become the mildew room if certain habits prevail. Clean clothes and sterile items need hot water and that means steam in the laundry room. A dryer is actually creating steam getting the water out of the clothing. If your laundry room has a door and do you want to watch TV at night in peace and quiet, does steam have any way to escape?
There may be a window and sometimes it is positioned behind the appliance. The appliance is almost 30 inches deep and if you can reach over without hurting your back to open the window, good. More power to you. If we open and close the window regularly that is a benefit but we may sometimes forget or it may be raining outside. In addition think of the physical properties of the steam that is creating little yellow drips on your ceiling. Do you actually think the steam is going to dive down 4 feet from the ceiling to go out the window you just opened? Why not put in an exhaust fan? Do you one better, put a timer on the exhaust fan. When doing the laundry you never have to worry about leaving the fan on when you went to work before the dryer was done! With a timer you don’t have to worry about staying up later when you run the laundry at night and you can go to bed! A timer is cheap. Consider the ways to add a fan and it can make your life easier.
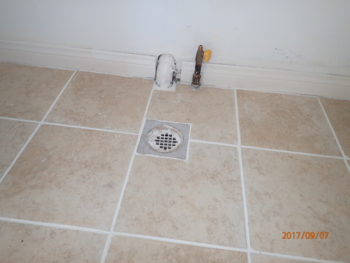
FLOORS
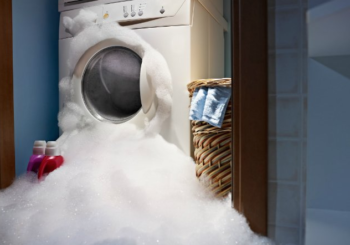
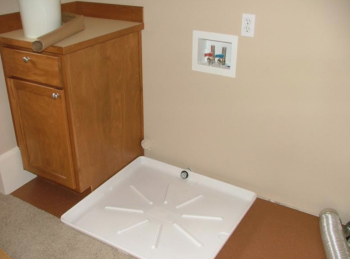
What about leaks on the floor? No one ever plans a leak. There are catch pans available to set the washing machine into to hold water. A good idea. The motor and the drum are spinning a few million times and do you know how long until that seal will leak? No one knows. So why worry? Put the washer in a catch pan. But that little 2 inch high pan will only hold so much water and maybe not the full load of water in the machine. Almost all of the catch pans have a built-in drain opening. Great! Connect a fitting and some PVC pipe and run the drain line outside of the house past your foundation. Do not run it under the house. That only invites trouble. Send it outside all the way.
Let’s continue: “My house is on a slab. I cannot drain downward any more as I am on a flat piece of concrete.” Yes, you may be on a slab, but an exterior discharge is still attainable. But it costs more than $5. Okay, you start by thinking that if you set the washer up on an elevated platform of 8 to 12 inches, you can have a storage drawer underneath. Your choice if the drawer holds dryer sheets or the dog leash, but go with me on this. The idea is to accomplish a safe drain that is better than a leak that damages thousands of dollars of hardwood, laminate or carpeting. So once the washer is set up there by the handyman you have the catch pan drain down to an A/C condensate pump! This pump can now run a small plastic discharge drain hose right back to the washer drain or sink at the wall! Nothing is perfect, but this can save a pile of money if and when a washing machine leaks.
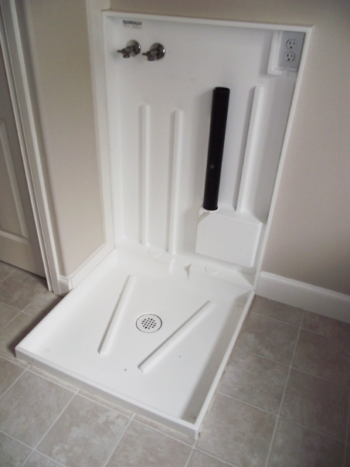
Depending upon the installation it may be possible to install a floor drain. Some properties are built with a floor drain. There are several maintenance concerns that need to be remembered when a floor drain is installed. This great idea is to prevent any flood or a leak at the washing machine hoses or laundry sink from going further into the house to cause damage. Any floor drain should discharge all the way to the exterior and not the crawlspace. I have also seen where the laundry floor may be a half step lower than the rest of the house. This along with a tile floor that can be pretty waterproof will prevent any floods from going out to the carpet or hardwood in the other rooms.
This floor drain is simply a flange that looks like a shower drain. The flooring again should be tile to be as water proof as possible. The flooring MUST BE SLOPED to drain to the drain hole and not the hallway carpet or wood. Do not let the tile guy be proud of “How level” he made the laundry floor. It must slope toward the floor drain if that is your design. As always, the Devil is in the details. A. Any discharge pipe from the floor drain should be screened on the outside so pests like a little mouse do not come up the pipe into the house. B. Some floor drains will have a plumber’s P-trap installed. A P-trap only serves a purpose to prevent sewer odors from entering the structure. If you have a two-story house and your laundry room is upstairs where all the bedrooms might be located, this could be a simple P-trap that connects to the rest of the drain lines upstairs. This sounds good so far. But as we all know, you certainly do not expect any floods or leaks into the laundry room and so the water will evaporate and dry out from the P-trap. This will allow all the odors to come into the laundry room when someone takes a bath or flushes the toilet. So what do we do?
One option sounds like a recipe. We have all seen how oil and water do not mix well in a bottle of salad dressing. And if oil does not evaporate quickly as water does, you can pour water down the floor drain into the P-trap until you see standing water or hear it fill up. Then pour a couple of ounces of a light cooking oil into the drain. The oil will float on top of the water and the water will not evaporate out this side of the drain. This will maintain the water seal and protect against odors in the laundry room. The water eventually does evaporate out the other side of the pipes. Then you simply pour a little more water in the drain. The water goes right through the oil and makes the seal up to the correct level again.
If you want you can install an automatic water valve under the floor built into the p-trap. This is like a pool automatic filling device. It acts like a toilet float and when there is an arm that turns on the water for a moment when the water level gets to a low point. It then automatically fills it back up. This may cost several hundred dollars to configure and install. This will work fine for 10 years hopefully, but everything with water some day needs fixing. These float arms get covered with hard water mineral deposits and lime scale and stop working in a few years. Then you have quite a bit of labor and expense to replace it. There are always choices on how to solve a problem, it just depends upon your budget and preference.
Speaking of automatic things, there are also newer water hoses that can be purchased for a washing machine. These specialty hoses have a small valve that acts like a flow meter. If the water hose bursts and begins to flood the house, this little valve is activated by the “fast” water flow. The normal filling up of a washer is slowly flowing the water through the hose. If the hose pops, the water flow is so fast that it pushes on a little interior flap/valve and overcomes the tiny spring that keeps it open for normal water flow. That high pressure and fast flowing water stream closes off the water flow! These hoses are a little more expensive and may end up saving a lot of damaged flooring expense. It is a little insurance policy, that’s all.
MISCELLANEOUS
How about a laundry sink? No problem. There is plenty of information on this web site discussing sinks for kitchen and bathrooms. All the information applies here also. Some may consider a deeper sink to allow soaking big items and cleaning fish or what ever. A deep dish sink or a spray wand are simply choices that have no restrictions other than normal plumbing codes.
How about the walls and ceiling in the laundry room? I do not recommend wall paper, acoustic tiles or acoustic sprayed ceilings. Many times wall paper will peel as the moisture releases the glues over time. Some wallpaper is vinyl and some are still a paper finish. To avoid mildew and mold in the room, if you are going to wallpaper use the vinyl finish products to resist absorbing steam. Acoustic tiles were a big thing in the 1960’s. Don’t do it. These cardboard tiles can absorb moisture and I have seen them fail and start to come down from the ceiling. Any time there is an acoustic spray installed, these days most folk want to remove it. That is wise in the laundry room so there is less chance of absorbing moisture an causing future issues.
Finally, pay attention to cabinets. The gallon jugs of soaps and bleach products can be heavy. Pay attention if any wall cabinets appear to sagging down or away from the wall. Did the installer connect with the wall studs when hanging the cabinet? Was you son helping and is he aware that drywall screws can hold 5 or 10 pounds but not 100 pound cabinets filled with products? Be aware of what may fail and when you see something suspicious, look into it a little better before accidents occur.
Dryer Gas Connections
This is really the easy part. Most people never mess with gas lines. Most of the gas pipe in the...
Dryer Vent
Dryer vents. What seems so simple can always be goofed up as long as two guys have a few beers...
Washing Machine Connections
Once the laundry appliances are in position, the water and electric connections may be low on the wall and not...